Home Theater

Sunday, September 30, 2007

The headshot

Mid-way through the driver installation, we took a break to do the IB tradition of the headshot. Think 'money-shot', and you'll understand the importance of this step for any IB installation. Three heads are better than one, and two Q18s are better than four Tempests (according to my calculations, anyway).

Ever the rebel, Griff had to do an alternate IB photo opportunity, though I don't quite think it'll catch on like the traditional headshot.

In the spirit of the innie-outie IB, here's an innie-outie headshot of Griff.

Labels:

Innie-outie

Hard to describe, but easier when seen. I needed compactness for my IB, and I needed a certain width (fit between rafters), and I wanted the ability to 'flip' it open to gain access above the HT.

Hence, the Innie-Outie. One driver faces 'in' (the top one above), while the other faces 'out'. Defying traditional views, but making perfect sense (and the reason we of the IB cult do our thing), the back of the speaker moves as much air as the front. The innie-outie takes advantage of this by simply reversing the polarity of the outie driver. I used banana plugs and just rotated one. A quick test with the 9V battery showed that when the innie move in (to the center of the manifold), the outtie moved 'out' (which also means toward the center of the manifold).

Labels:

Driver loading


Ha! You can't measure it in Ohms. The kids measured it in grunts. I think it ended up being about 7! The flip-top IB is already paying off. I would have had to drag this through the attic gauntlet!

Labels:

Adventures in manifold moving

As described somewhere along the way, getting above the HT is a pain. I actually have to climb a wooden ladder to access the area.

Now imagine climbing a wooden ladder... lifting a huge MDF manifold above your head.

I managed to get it up there... but due to the tightness of the passageway, I had to drag the Tempest manifold out (btw, it is free to whoever wants it, come pick it up). Once that was done, I had to haul the huge Q18 manifold over some HVAC vents and into the place I have to crawl for a bit. I decide to go first and drag the manifold behind me... and it gets hung.

No WAY! I tried putting it on its side, at an angle, etc. I was seriously considering how I could disassemble it and reassemble it, when I- out of frustration- pulled up a 2x4 I had installed a while ago to make it easier to crawl on. The manifold got banged up, but somehow I got it through the passage. Which then brought me to a real horror thought. What if my intricately-designed manifold would be too tall for the space?! I drag it to the spot, thinking I'd end up having to cut off the frame where the hinges would attach. But it fits- swings into place with a good 20mm of room to spare. *Whew*

This thing is going to be cool!

Labels:

Friday, September 28, 2007

Latch look


Google Sketchup is cool- all kinds of models you can import. (No, not Russian ones, no.. not ... nevermind).

Here's a view from the bottom. I've actually got two trunk type latches ready to go. The 2x6 rafters will be faced with MDF and the latches will be on that surface, hooking to the inner layer of MDF on the manifold. Thomas of Cult fame suggests a wide gasket surface which I need to pick up.

Labels:

Life imitating Art

Art? Hardly, but it really is cool to take something from a conceptual drawing and turn it into a finished product.

This is the bracket for the Neutrik connector, one wire going inside for the reversed driver, with the other going to the forward-facing one.

Labels:

Thursday, September 27, 2007

Hinging on a decision

I really want a way up to the attic above the HT. There is one, which from the HT involves going downstairs. Through the kitchen. Up the stairs to the second floor. Down the hall into the walk-in attic. Up the ladder to the second level of attic. Then avoiding the AC and water heater units to the end of that level, taking a left and crawling to the bonus room attic space. Believe me, when I'm up there and find I'm missing a screwdriver for what I need to do, I pretty much give up for the day.

Enter the HingedIBManifold (tm). I've asked the Cult and got no response on if it is feasable. The idea is that the manifold will sit in a frame on top of the existing rafters. This frame will be hinged to the rafter on one side. With corresponding latches on the underside- and a clever reversed driver on the hinge side, I should be able to get on a ladder, undo the latches and use the manifold as a trap door (can trap doors go up?).

Here's the latest SketchUp with hinges.

Click on it to get a bigger view. Also note the Neutrik panel with wires going to both inside the manifold and to the second driver.

The 'hinging on a decision' part is that I can install the manifold as is, without the frame. The dimensions are the same and it would fit within the rafters- and be somewhat more solid. However, I've pretty much decided that the hinge will happen (translation: I've already bought hinges and latches).

Labels:

Neutrik bracket

I love the solid feel of the Neutrik connector. I've built a bracket for the connector and will be attaching it to my manifold. I've already wired the end of my speaker wire going to the EP2500 with a Neutrik plug and tested it into the receptacle on the amp. The EP2500 sends both channels on the upper connector so I only need a single one for the 4 wires going to the sub. I'll be setting it up as parallel again (single input, dual outputs).

Here's the latest sketchup of how it will be wired and mounted.

Labels:

Your friendly neighborhood speaker store

These guys are so old-school, I don't think they even have a website. Despite the low-tech, I love going to Creative Acoustics in Raleigh, NC. I first met them when I had some speakers rebaffled. These guys *love* sound. The back of the shop is a workshop with templates of huge speaker boxes- most of their business is pro-sound. The front is a retail store for car stereo and such. And inbetween is the service area, that gives me a thrill when I get to walk back there.

Sure enough, they had both neutrik connectors I needed and t-nuts to secure the woofers to the manifold. I also got advice on how to wire the connectors, how to run the wire into the manifold and how to gasket my trap door. Find that for free on some cut-rate internet outfit. Oh, and the prices were about the same I'd have paid on the internet- and I have it in hand. Right now.

Off to make a neutrik bracket!

Labels:

In a bind

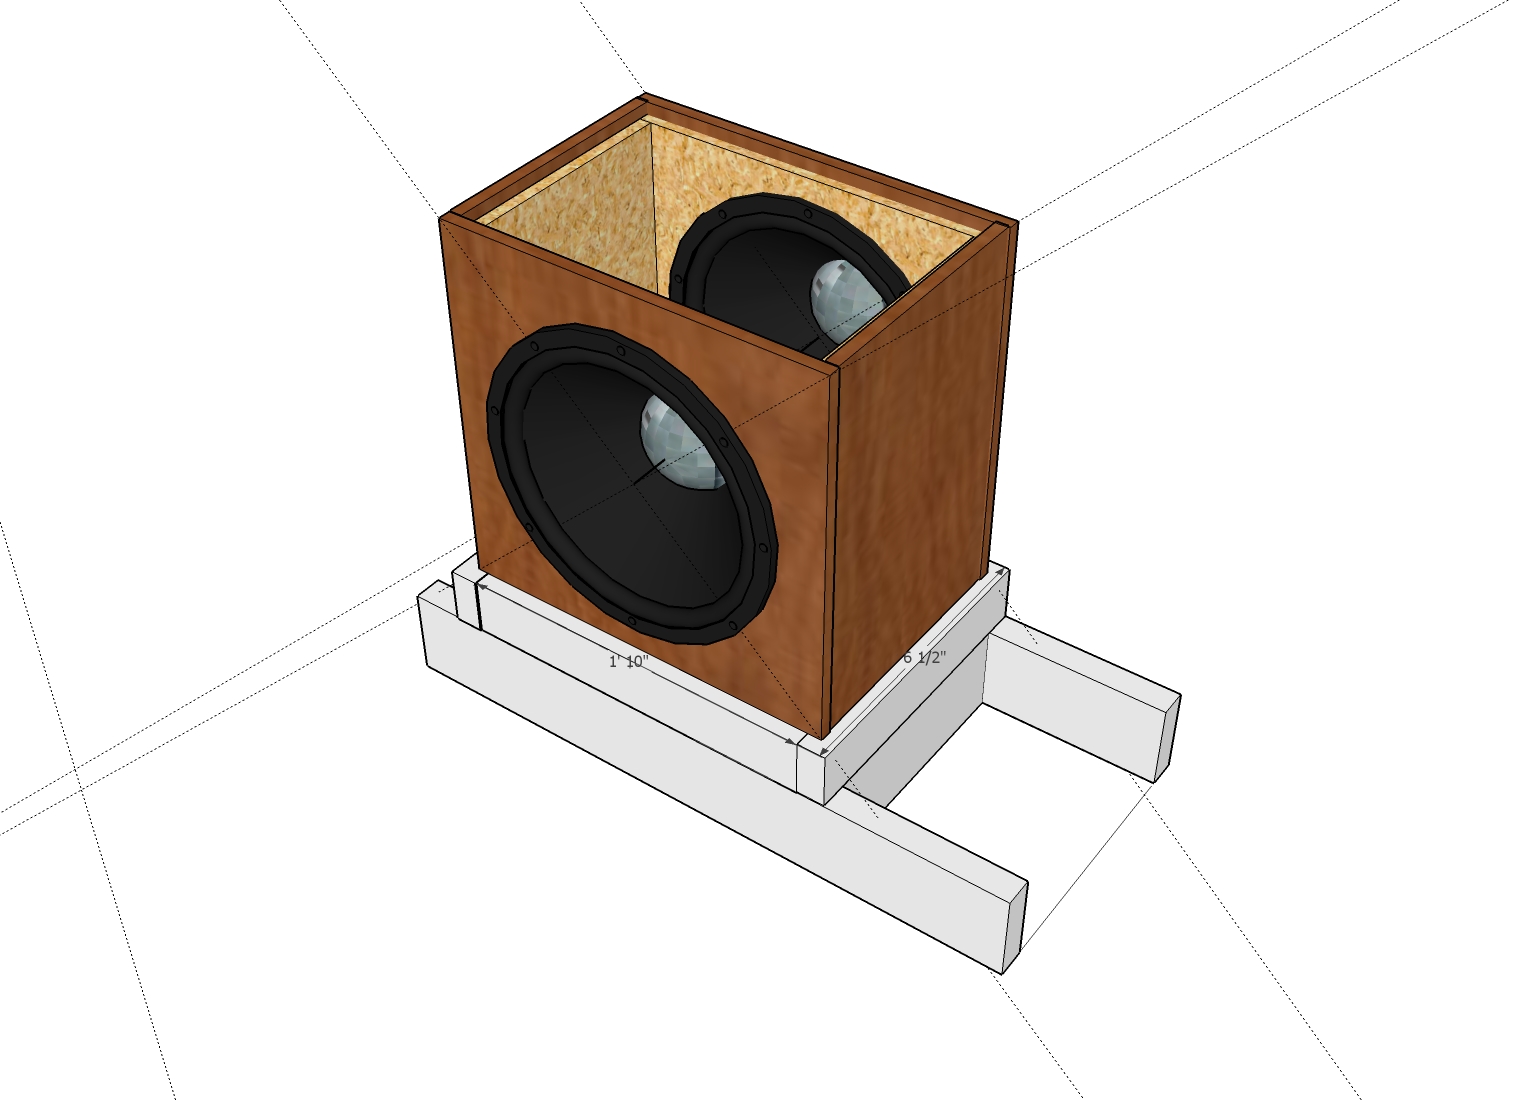
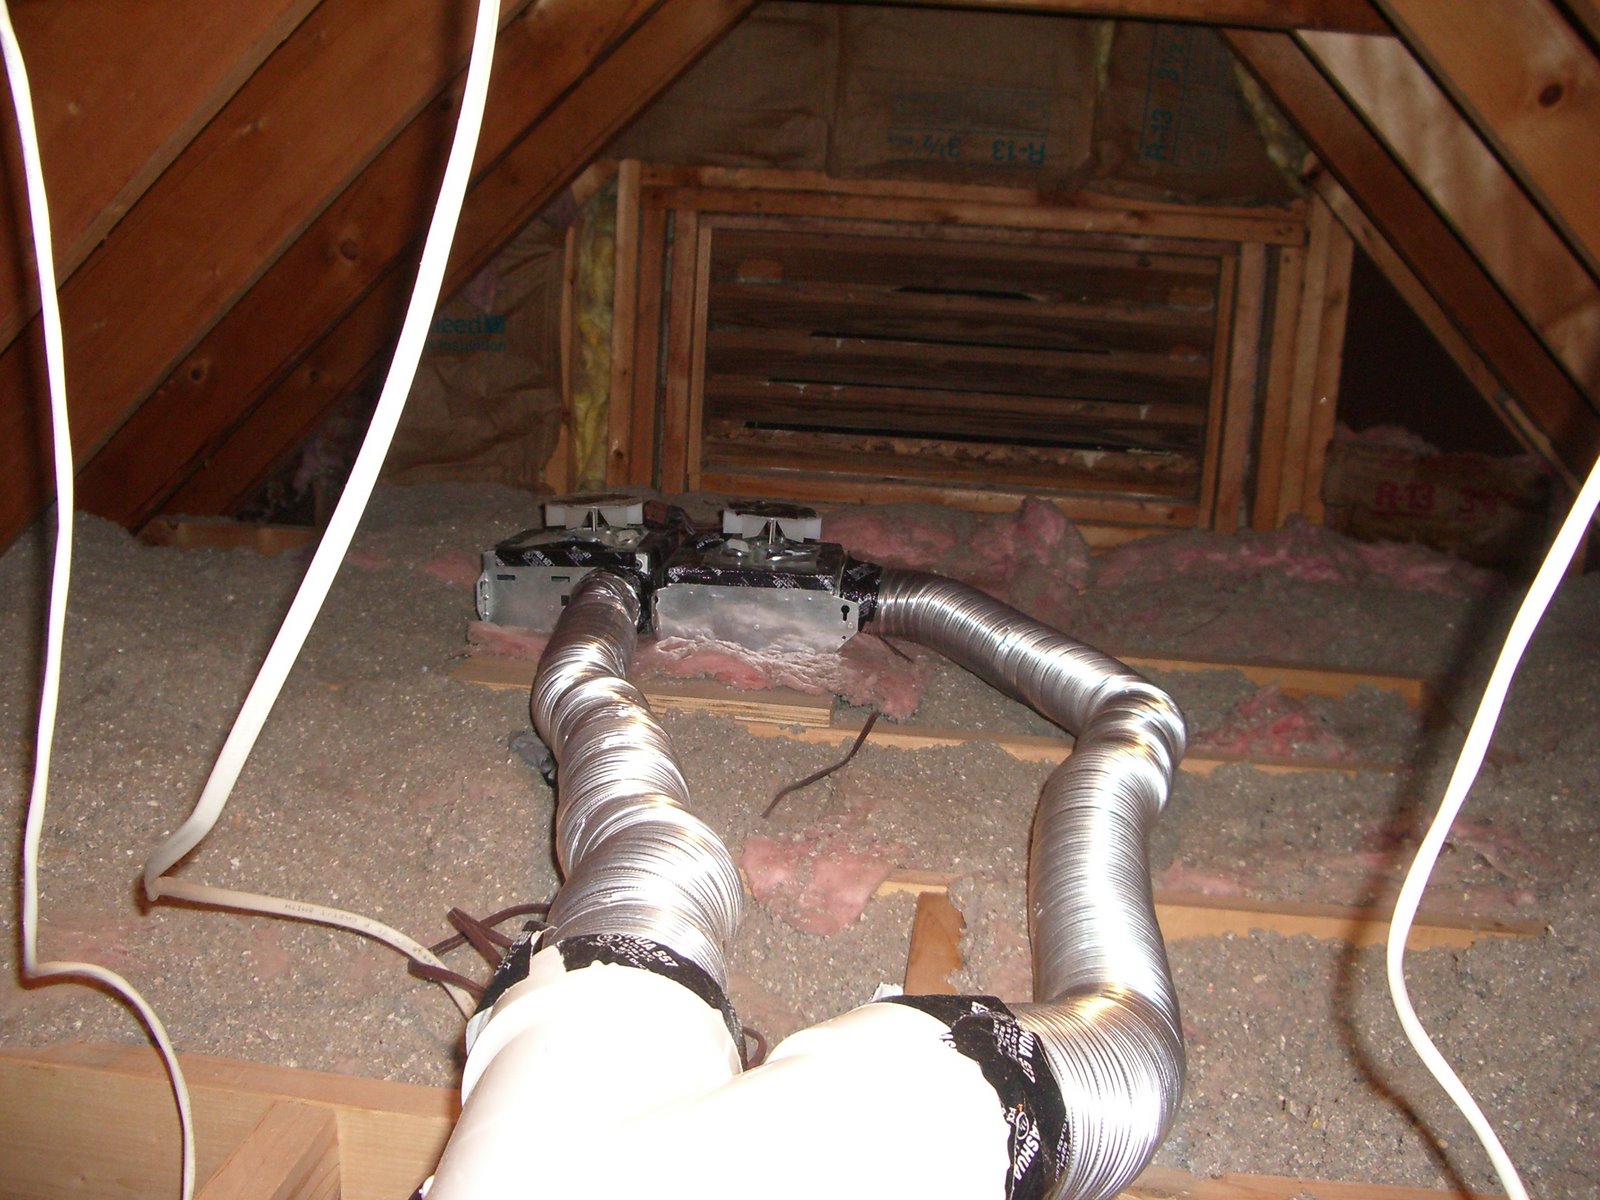
The manifold is done (well, except for the top plate, but that'll be glued on today). I've cut the 2x4 base which will mount to the existing rafters, but haven't attached it yet. I'm wondering if I should spread the load across more than two rafters? We're talking 80# of drivers plus 50# in the manifold itself... I think I'll just tie the rafters together with some 2x4 to help balance the load.


I've decided to do a reversed and standard speakermount to make the manifold more compact up in the attic space. What this means is that one of the speakers will have its (+) and (-) the opposite of the other, so that when one moves 'forward', the other moves 'back'. The net result is that both move 'in' to the center of the manifold.

Because of the large power needs for drivers this size, I'm really considering having a speakon connector bringing the power up to it. The EP2500 already has a speakon output which can send up both channels. I could install a speakon jack at the manifold and wire from there.NL4FXNL4MD-H
At the manifold, there's a second issue, which is that I need to get one pair of wires to the inside of the carefully-sealed box. I was thinking of using speaker binding posts, but they need to go through 1.5" of MDF, so I may just drill a tight hole and thread the wires through it.

I'll head to the speaker store today to see if they have the neutrik connectors.

Labels:

Thursday, September 20, 2007

Construction Pics


Not too far off from the google sketch. Notice how it was done so that the bottom could fit into a 2x4 frame. And the top is made to have two layers as well, with one over the other.

Posted by Picasa

Labels:

Doubled ventilation

Here are some shots of how I added a second bathroom fan to my forced ventilation. I added a y-joint to the upright and have a second fan configured like the first. I'm not sure why the ventilation was going out before, because it hasn't happened since I did this project.


Labels:

Magnififold

The cuts have been made, even though I seem to be a bit lacking in my measur(twice, cut once)ing ability. I've got it quasi-assembled, but I need to get it cobbled together because I have to cut out the speaker holes for mounting. The Jasper Jig that I have is fantastic (we already used it for Andy's), but can only cut about 3/4" due to the router clamp hitting the wood if I set it deeper. So, I have to drill the pilot hole through both pieces of MDF, then do them separately (or they could be glued, but have to flip it over.

Here's another sketchup of it:

Labels:

Tuesday, September 18, 2007

Big Speaker


Yes, they are! The Ficaraudio Q18s are here and they're huge! I need to work on the manifold. The clever hinged design is having me really work at making it large enough to be a big enough output so there aren't compression artificats. The speaker area is about 375 square inches, so I need at least that in my manifold output to the room. The current cutout is 15x22, which falls short. I don't want to screw with cutting joists, so the 15" is fixed as that is the distance between them, so I'll have to get wider- which doesn't help the issue.
Posted by Picasa

Labels:

Monday, September 17, 2007

IB excited

Pardon the pun... my Q18s have arrived. They're huge! And heavy. I'm working on the box design right now. I'm going to use doubled MDF. Here's a quick google sketchup...

What is going to be interesting about this is that I'm going to mount the box on hinges to give me attic access. It's proving to be challenging, but fun at the same time. Stay tuned.

Labels:

Saturday, September 08, 2007

Summertime Heat Wave

The forced ventilation fan isn't working well enough. Let me rephrase- when it works, it works well enough. I think the fan shuts off for some reason- or maybe it is the current switch. In any case, at some point, hot air is no longer being evacuated and then the projector shuts off.

I'm going to do two things- the first is to double-up on the fans to introduce some reliability. $11 fans are amazingly reliable- but two will be better. I've purchased a second fan which I'll put on a Y-bracket so that potentially twice the air will flow. I think I need to get a little creative to make sure one fan doesn't starve the other, perhaps by using the built-in flapper valves.

The second is I want to redesign the hush box. Right now the only intakes are three holes in the bottom of the box. These are hard to filter and probably don't flow enough air into the box. Indeed, I've been running the box with the side open just for that reason. The redesign I want to do is to swiss-cheese and channel the bottom board. I'm thinking slits that run perpendicular to each other on the top and bottom. Kind of like waffle fries (hmm, all this talk of food must be Freud telling me it is time to eat). Yes, waffle fries. Then, those slits will open up to the back of the box where I'll have an easier-to-replace filter- hopefully a standard size. This serves a couple of purposes- ease of replacement, not having projector body directly on filter material, and should direct the intake noise to the back of the room instead of below.

Labels:

Friday, September 07, 2007

Husher Box

The hushbox needed a makeover. Besides the duct tape holding on the front piece of glass, it wasnt' getting enough air. I had designed the box to be semi-passive. Vent holes in the bottom combined with a smokestack on top meant that heat should go up. It did, but not enough, and when there's a hot attic, even less. So I added a vent fan. That worked okay, but it would still let the projector overheat. I then just pulled the side off the box. That was best, but still occasionally it would over heat- I think becaues the fan would sometimes cut off.

So, a redesign of the box was in order. First of all, instead of holes being in the bottom, I wanted them in the back. I put a big filter in the back and have vent holes there, as well as a bunch of small holes in the bottom of the box. These meet up with routed tracks which also go to the filter at the back of the box. Ideally, when there's a vacuum up top, it'll bring cold filtered air to both the back and underneath the box. The only wrench is that one of the kids stepped on the taken-off side panel, so I need to refabricate it. Coming soon. In the meantime, the new box looks great.

Labels:

Saturday, September 01, 2007

This one goes to 18!

I'm paraphrasing Nigel, but it is really Derek Smalls who would appreciate the new bass. I've ordered a pair of Ficaraudio Q18s.

They're beautiful.


I'm getting them custom-built for HT, which means that it'll have a single voice coil, 4Ohms. This monster has 27mm of Xmax. I've sold the Tempests to my neighbor who is inspired
by my HT and is building his own. Fortunately, we've found a place where he can put them in a line array- which will be very cool. Though I think he needs even more of them- a line array needs to be like 4!

Labels: